How to Set Bed Temperature in Orca Slicer in Just (4 Steps)
If you are in 3D printing then one key lesson you must keep in mind is that different materials required different temperature settings for optimal extrusion. In the early days of Orca Slicer there were a few options for temperatures settings such as PLA and ABS, but thanks to the new features now you can set the Orca Slicer temperature between under 200°C to well over 300°C.
An optimal temperature setting can make your printing quality better or a wrong temperature can affect the adhesion strength. This guide covers the complete guide on how to set bed temperature in Orca Slicer using its settings. So make sure you stick till the end for better learning.
Read Also: Download Orca Slicer » 3D Printing Slicer (2025)
What is Bed Temperature and Why is it Important?
Bed temperature refers to the heat level of the print bed, which affects how well the first layer adheres. Each filament type requires a different temperature to avoid printing issues:
| Filament Type | Recommended Bed Temperature (°C) |
| PLA | 50–60°C |
| PETG | 70–85°C |
| ABS | 90–110°C |
| TPU | 50°C (or unheated) |
| Nylon | 80–110°C |
Why is bed temperature important?
Correct bed temperature is important in 3D printing because it directly affects the first-layer adhesion, print quality, and overall print stability. A correctly heated bed prevents warping because it helps decrease the cooling process. Which helps the first layer detach smoothly from the surface.
Setting Bed Temperature in Orca Slicer increases adhesion which minimizes the risk of layers detaching during mid-print failures. In addition, the best temperature makes it easy and safe to remove certain materials like ABS and PETG that fall off the bed as they cool, thus preserving the print as well as the build surface.
Adjusting the optimal bed temperature in Orca Slicer guarantees uniform prints of desired quality by eliminating typical adhesion concerns.
Read Also: How to Change Nozzle Size in Orca Slicer (A Step-by-Step Guide)
How to Set Bed Temperature in Orca Slicer – Step-by-step
To begin, start Orca Slicer on your computer and load the related 3D model. Then import STL, 3MF, or OBJ files by either dragging them into the slicer, or navigating to the “Open File” section.
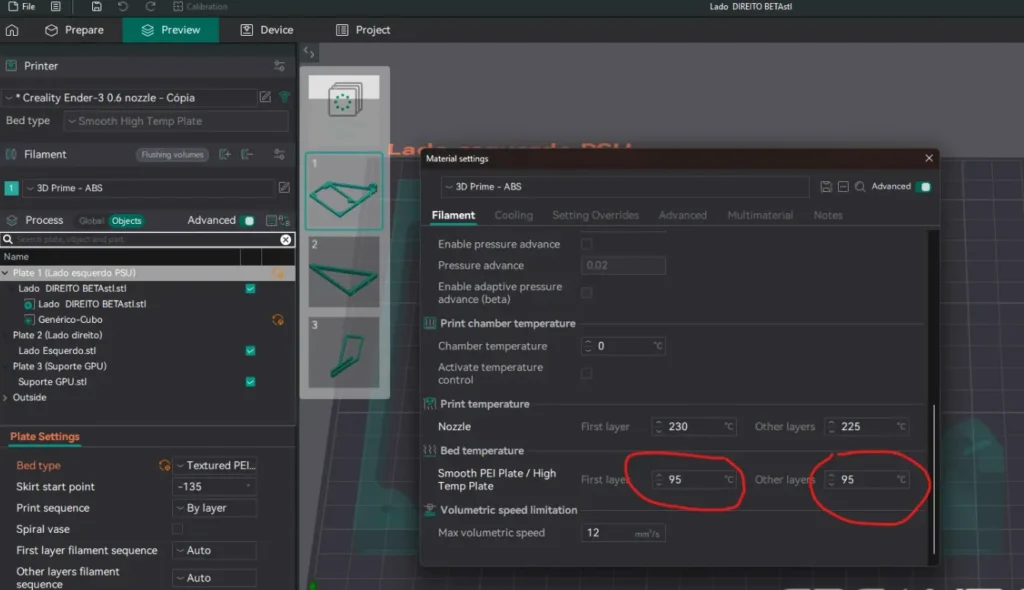
Now, click on the Filament Settings panel on the right side of the screen. This section controls important temperature settings for both the nozzle and the heated bed. Click on the temperature tab to expand it, revealing the adjustable parameters.
Next, locate the required “Bed Temperature” section. Set appropriate temperature values according to the filament material being used. For example, PLA requires approximately 50–60°C, whereas ABS needs 90–110°C. If there is an option that allows you to set different temperatures for the first layer and the other layers, change those values to improve adhesion.
Once the temperature is configured, click “Slice” to create the G-code for your printer. Before completing the task, do not forget to check the preview panel once more to confirm that the temperature settings are properly set. Finally, if everything is correct, go ahead and export the file to your printer.
After completing all configurations, start the printing process and watch the first few layers closely. If you notice the prints are not adhering adequately, consider increasing the temperature of the bed by 5°C. Decrease the temperature if it adheres too tightly. Maintaining proper temperature is crucial because even slight increments or decrements can affect the adhesion and overall quality of the print.
If you are interested in a video tutorial on how to set bed Temperature in Orca Slicer this video can be helpful. Video Link:
Click on this Youtube Icon
Conclusion
In Orca Slicer, the optimal bed temperature is important to achieve proper first-layer adhesion, avoiding warping, and enabling successful execution of the print. Every filament has its predefined temperature which can also be adjusted for smoother printing outcomes.
If the first layer becomes unattached, the bed temperature should be raised, followed by a reduction to prevent overly strong adhesion. It is imperative to monitor the first few layers and modify them accordingly. Fine-tuning bed temperature settings will improve print consistency